This section covers the following topics:
The JavaTM Plug-in Control Panel enables you to change the default settings used by the Java Plug-in at startup. All applets running in an active instance of Java Plug-in use these settings.
On Windows: From the Windows Control Panel, double-click the Java coffee-cup icon labeled Java Plug-in to launch the Java Plug-in Control Panel.
On Solaris and Linux: You can run the Control Panel by launching the ControlPanel executable file. In the Java 2 SDK, this file is located at:
<SDK installation directory>/jre/bin/ControlPanel
It is also located at:
<SDK installation directory>/bin/ControlPanel
For example, if your Java 2 SDK is installed at /usr/j2se, launch the Control Panel with this command:
In a Java 2 Runtime Environment installation, the file is located at:/usr/j2se/jre/bin/ControlPanel
You can also use Netscape to visit the Control Panel applet page, which was installed inside the JRE directory as the file ControlPanel.html. In the Java 2 SDK this file is located at:<JRE installation directory>/bin/ControlPanel
In the JRE:<SDK installation directory>/jre/ControlPanel.html
<JRE installation directory>/ControlPanel.html
There are six panels from which you can set various options within the Java Plug-in Control Panel. These panels are labeled:
Each is described separately below.
NoteThe settings shown for check boxes and radial buttons in each panel below, with the exception of the Browser panel, are the default (installation) settings. The check boxes for the Browser panel are determined according to user selection during installation. |
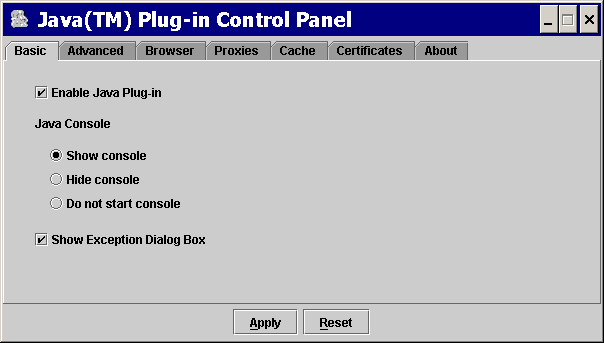
The Basic panel looks like this:

Use the Basic panel to set the following options:
[???There are two discrepancies above—Show Java Console (checked) and Show Exception Dialog Box (checked) appear to be default in 1.4 FCS. Writeup above states opposite.]
The Advanced panel looks like this:
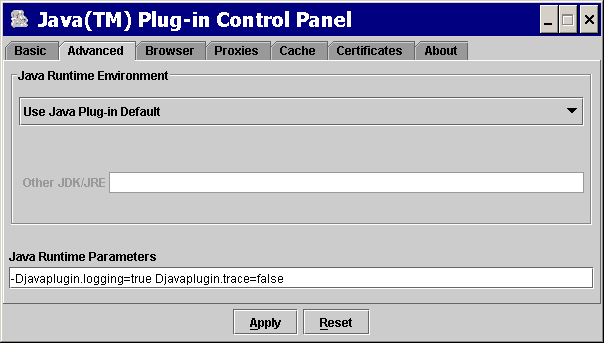
Use the Advanced panel to set the following options:
NoteOnly advanced users should change this option. Changing the default JRE is not recommended. |
Overrides the Java Plug-in default startup parameters by specifying custom options. The syntax is the same as used with parameters to the java command line invocation. See the Java 2 Standard Edition (J2SE) documentation for a full list of command line options. The URL below is subject to change:
http://java.sun.com/j2se/1.4/docs/tooldocs/<platform>/java.htmlwhere
<platform>is one of the operating systems: solaris, linux, win32.Below are some examples of Java runtime parameters.
Enabling and disabling assertion supportTo enable assertion support, the following system property must be specified in the Java Runtime Parameters:
-D[ enableassertions | ea ][:<package name>"..."
          | : <class name> ]
To disable assertion in the Java Plug-in, specify the following in the Java Runtime Parameters:
-D[ disableassertions | da ][:<package name>"..."
          | : <class name> ]
See Assertion Facility for more details on enabling/disabling assertions.
Assertion is disabled in Java Plug-in code by default. Since the effect of assertion is determined during Java Plug-in startup, changing assertion settings in the Java Plug-in Control Panel will require a browser restart in order for the new settings to take effect.
Because Java code in Java Plug-in also has built-in assertion, it is possible to enable the assertion in Java Plug-in code through the following:
-D[ enableassertions | ea ]:sun.pluginTracing and logging support
Tracing is a facility to redirect any output in the Java Console to a trace file (
.plugin<version>.trace).
-Djavaplugin.trace=true

          -Djavaplugin.trace.option=basic|net|security|ext|liveconnect
If you do not want to use the default trace file name:
-Djavaplugin.trace.filename=<tracefilename>Similar to tracing, logging is a facility to redirect any output in the Java Console to a log file
(.plugin<version>.log) using the Java Logging API. Logging can be turned on by enabling the propertyjavaplugin.logging.
-Djavaplugin.logging=trueIf you do not want to use the default log file name, enter:
-Djavaplugin.log.filename=<logfilename>Furthermore, if you do not want to overwrite the trace and log files each session, you can set the property:
-Djavaplugin.outputfiles.overwrite=false.If the property is set to
false, then trace and log files will be uniquely named for each session. If the default trace and log file names are used, then the files would be named as follows
.plugin<username><date hash code>.trace

            .plugin<username><date hash code>.log
Tracing and logging set through the Control Panel will take effect when the Plug-in is launched, but changes made through the Control Panel while a Plug-in is running will have no effect until a restart.
For more information about tracing and logging, see the chapter called Tracing and Logging.
Debugging applets in Java Plug-in
The following options are used when debugging applets in the Java Plug-in. For more information on this topic see the Debugging Support in the Java Plug-in Developer Guide.
-Djava.compiler=NONE

          -Xnoagent

          -Xdebug

          -Xrunjdwp:transport=dt_shmem,address=<connect-address>,server=y,suspend=n
The
<connect-address>can be any string (example:2502) which is used by the Java Debugger (jdb) later to connect to the JVM
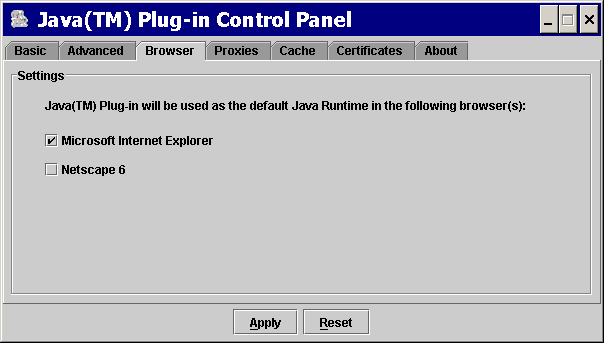
This panel relates only to Microsoft Windows installations; it
does not appear in other installations. Check any browser for which you want
Java Plug-in to be the default Java runtime, instead of the internal JVM of
that browser. This is to enable APPLET tag support in Internet
Explorer and Netscape 6 via Java Plug-in.
The Proxies panel looks like this:
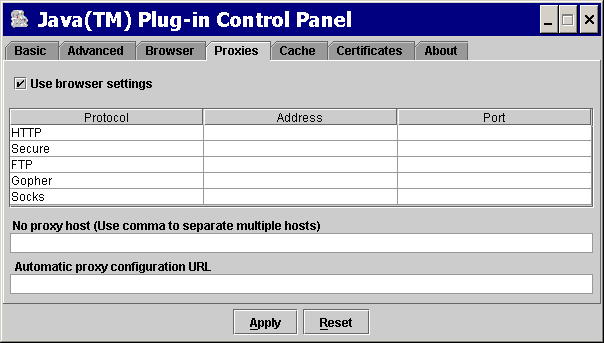
Use the Proxies panel to use the browser default settings or to override the proxy address and port for the different protocols.
FindProxyForURL function. FindProxyForURL has
the logic to determine the proxy server to use for a connection request.For additional details about proxy configuration, see the chapter called Proxy Configuration.
The Cache panel looks like this:
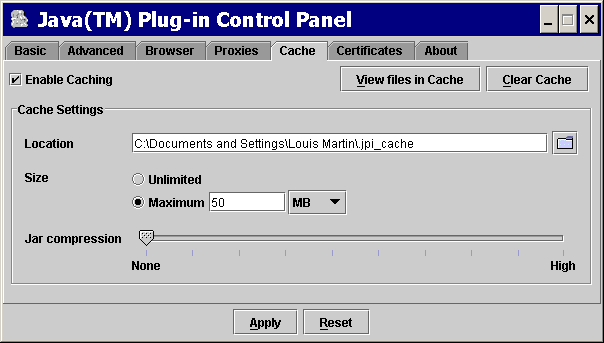
NoteThe cache referred to here is the sticky cache; i.e., the disk cache created and controlled by Java Plug-in which the browser cannot overwrite. See Applet Caching. |
Check this to enable caching. This the default setting (checked). With applet caching enabled, performance is improved because once an applet is cached it no longer needs to be downloaded when referenced again.
The Java Plug-in caches files of the following types downloaded via HTTP/HTTPS:
.jar(jar file)
.zip(zip file)
.class(java class file)
.au(audio file)
.wav(audio file)
.jpg(image file)
.gif(image file)
Press this to view the cached files. Another dialog (Java Plug-in Cache Viewer) will pop up and display the cached files. The Cache Viewer displays the following information about the files in cache: Name, Type, Size, Expire Date, Last Modified, Version, and URL. In the Cache Viewer you can also selectively delete files in the cache. This is an alternative to the Clear Cache option described below, which deletes all files in the cache.
Press this to clear all files in the cache. You will be prompted (Erase all files in ... _cache?) before the files are removed.
You can use this to specify the location of the cache. The default location of the cache is
<user home>/.jpi_cache, where<user home>is the value of the system propertyuser.home. Its value depends on the OS.
You can check Unlimited to make the cache unlimited in size; or you can set the Maximum size of the cache. If the cache size exceeds the specified limit, the oldest files cached will be removed until the cache size is within the limit.
You can set the compression of the JAR cache files between None and High. While you will save memory by specifying higher compression, performance will be degraded; best performance will be achieved with no compression.
The Certificates panel looks like this:
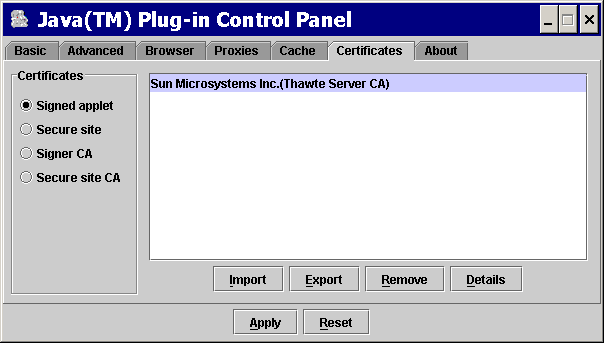
Four types of certificates may be selected:
These are certificates for signed applets that are trusted by the user. The certificates that appear in the signed applet list are read from the certificate file
jpicerts<version>located in the<user home>/.javadirectory.
These are certificates for secure sites. The certificates that appear in the Secure site list are read from the certificate file
jpihttpscerts<version>located in the<user home>/.javadirectory.
These are certificates of Certificate Authorities (CAs) for signed applets; they are the ones who issue the certificates to the signers of signed applets. The certificates that appear in the Signer CA list are read from the certificate file
cacerts, located in the<jre>/lib/securitydirectory.
These are certificates of Certificate Authorities (CAs) for secure sites; they are the ones who issue the certificates for secure sites. The certificates that appear in the Secure site CA list are read from the certificate file
jssecacerts, located in the<jre>/lib/securitydirectory
For Signed applet and Secure site certificates, there are four options: Import, Export, Remove, and Detail. The user can import, export, remove and view the details of a certificate.
For Signer CA and Secure site CA, there is only one option: Detail. The user can only view the details of a certificate.